
The ultimate Windows HTPC
The myHTPC workshop from my July 2004 APC batch, reproduced from the manuscript that went to the magazine — the piece that was commissioned at the highest rate, abandoned on day one under an XMLTV heading, and finished across one long weekend.
This is the fourth piece of the batch I wrote for APC in July 2004, and the one the commission valued most: the workshop brief, archived with the roundup, asked for 1,400 words at AUD$500 against the roundup’s 1,300 at $400, same Sunday-6pm deadline, same TwinHan card on loan. The invoice that closed the batch bills it in full — “myHTPC/DABDig Workshop, 1400 words, $500” — for the September 2004 issue. It is reproduced from the manuscript as it went to APC; no edit of it survives, and no printed page either.
The journey shows in the files. The first sitting began on Monday the 5th of July at 11.12am and was abandoned two hours later, mid-document, under a bare heading reading “XMLTV” — that unfinished copy was filed with the screenshots and sat for years looking like a damaged file. The same document then grew through the working week: 1,783 words by Friday night, 2,162 by Saturday afternoon, and on the Sunday morning of the deadline a save-as trimmed it to the 1,827 words below. The brief’s working title, “Workshop: setting up MyHTPC with DabDig on your PC”, still sits in every version’s file properties; the manuscript itself opens with the title APC was actually sent, “The ultimate Windows HTPC” — and a standfirst whose byline reads Christine, in my own hand, as the remote controls piece’s does.
The six screenshots were sent as zipped BMPs and two TIFFs and are published here as PNG, pixels unchanged, each with the manuscript’s caption beneath it. They date themselves twice over: the myHTPC menu and programme guide carry on-screen clocks reading Tuesday the 6th of July 2004 at 7.50 and 7.51 in the evening — the second day of writing — and the three DVD-boxout shots follow one actual recording, “Empires: Rome in the First Century” off SBS, from demultiplexing through authoring to a burner tray, on the Saturday. The manuscript’s // Picture // markers are replaced by the pictures they name; the first marker labels its caption with a literal “caption:”, the brief’s own slug format, and that label is not carried.
Word’s HYPERLINK field codes are gone and their addresses kept, filenames, paths and the channels.ini extract are set in code style, and the slips stand as written: “We changed these the lines”, “You will be need to download”, “a utility for downloading TV program listings from the web and convert into the XMLTV format”, and — in the boxout’s final flourish — “Now, turn to turn your file layout into a burnable disc image”. Nobody proofreads a manuscript on deadline morning, and this is what went to the magazine.
Download the manuscript (DOC, 49 KB) · Download the Saturday draft (DOC, 58 KB) · Download the first week’s draft (DOC, 50 KB)
The ultimate Windows HTPC
Christine Tham explains how to set up a digital-TV, DVD-burning, all-singing, all-dancing, home theatre PC using only free software.
Skill level: Advanced
System requirements:
- Windows XP
- At least a Pentium4 2GHz CPU if your card supports HDTV and you want to watch it
- At least 256MB RAM
- An AGP/PCI Express video card that supports DirectX 8.1 or better
- At least 80GB hard drive space for your recordings
- a digital TV tuner card supported by DABDig (TwinHan VisionPlus, Nebula DigiTV, Hauppauge Nova-T, DPANDA DVB-T and the AVerMedia AVerTV DVB-T.)
Time to complete: about 1-2 hours
Building a home theatre PC (HTPC) to watch and record digital TV (DTV) is a dream project, but most software bundled with digital TV cards falls well short of fulfilling most people’s expectations.
Fortunately, with some freeware utilities, you can have it all: one interface to watch and record digital TV, play movies, browse photos and listen to music. For this workshop, we’ll use the excellent myHTPC open-source package to schedule digital TV recordings using the DABDig plugin, and get an Australian electronic program guide for your state working too.
APC used a TwinHan VisionPlus digital TV card to develop and road-test this workshop, but the steps are similar for other brands of cards.
Installing MyHTPC
Before installing MyHTPC, a pre-requisite is to download and install Microsoft XML Core Services 4 SP2. This provides the functions to allow myHTPC to display an EPG. Then, download and install MyHTPC.
Accept the default installation location of C:\Program Files\myHTPC. Don’t run the configuration wizard just yet. Download the latest version of DABDig and unzip the contents into the C:\Program Files\myHTPC directory (not a subdirectory.) Download the DABDig myHTPC Plug-in from the Plug-ins section of the myHTPC web site. Copy both the readme file and myHTPC_EpgDABDigPlugin.wsc into C:\Program Files\myHTPC.
Open the C:\Program Files\myHTPC directory. Double-click on dabdig.vbe to execute the DABDig installer script. It will detect your TV tuner card installed and create a settings file called dabdig.ini. Ignore the error messages that may appear on-screen – they’re the result of the script running DABDig without command line parameters.
Edit dabdig.ini using Notepad. We changed these the lines:
OUTPUTTARGET=D:\My Movies
DEFAULTDEVICE=DVB
VISIONDTVCHANLISTFILE=Favorite List\Temp.lst
(Note: you need to verify the correct filename in your installation in the directory C:\Program Files\PC-TV\VisionDTV\Favorite List)
You’ve already unzipped the DABDig and DABDig MyHTPC plugin files in a previous step, but now you need to ‘register’ them with MyHTPC so it starts using them. Right click on myHTPC_EpgTVPIPlugin.wsc and select “register”. Do the same with myHTPC_EpgDABDigPlugin.wsc.
Create a new folder called C:\Program Files\myHTPC\data\tv\listings.
Run the myHTPC Configuration Wizard from your start menu MyHTPC folder.
It’s wise to put all your media files in separate folders on a different hard disk or partition, for example D:\My Pictures for my Pictures, D:\My Music for my Music and D:\My Movies for my Movies. That way, if you need to reinstall Windows, you can easily reformat the original disk/partition without endangering any of your valuable media files.
Now run Configure MyHTPC from the same start menu folder.
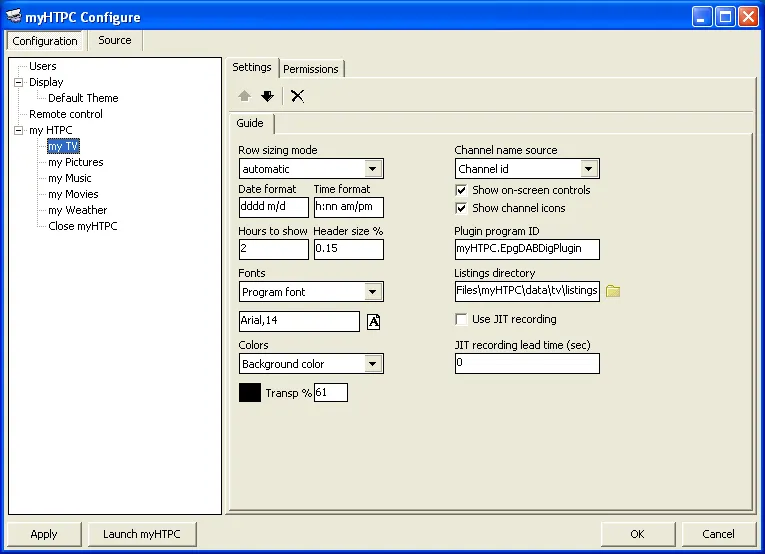
myHTPC Configure screen: Add a “my TV” menu item to my HTPC and configure it to use the DABDig plug-in.
Select my HTPC on the menu tree at the left of the window. Click on the New TV icon just under the Settings tab. Enter myHTPC.EpgDABDigPlugin (note the “.” rather than the “_” used in the filename) into the Plugin program ID field. Enter C:\Program Files\myHTPC\data\tv\listings into the Listings directory field.
You have two options for scheduling TV recordings:
- If you check the Use JIT Recording checkbox (“JIT” is an acronym for “Just In Time”), then you need to keep myHTPC running continuously and it will launch your viewer application (eg. VisionDTV) when it’s time to record the program. You can also cancel recordings from myHTPC.
- If you uncheck Use JIT Recording, then DABDig will schedule the TV recording directly into the viewer application (eg. VisionDTV). You will need to leave the VisionDTV running in the background to ensure it commences recording at the appropriate time. DABDig does not support cancelling of scheduled recordings so you will need to do that manually in the viewer application if you need to.
Press the Apply button on the lower left of the window.
Now select new TV on the menu tree at the left of the window. Press the F2 key and rename this to my TV and press the Enter key. Press the up arrow on-screen button (just underneath the Settings tab) and move my TV up until it’s just underneath my HTPC. You have now finished the configuration and can exit the application.
Bolting in the EPG
All you need now is a way of downloading TV program listings into myHTPC. This is where XMLTV comes in. XMLTV is an open-source project to standardise the downloading of EPGs from various countries in the world to a standard XML format that can easily be read by the myHTPC TV/EPG module.
In Australia, television channels claim copyright on their program listings, so most websites that republish them are required to pay a hefty licence fee. As a result, it may be a breach of the terms of use of some web sites to use an XML EPG grabber to pull data off their sites. Before you use any such tools, make sure you satisfy yourself that you are not breaching any terms of use on the sites. If you’re unsure of where you stand, you shouldn’t use these tools.
One program that will download TV listings in XMLTV format is TVHarvest (another popular option is TV_Grab_AU but it was temporarily unavailable for download at the time of publication.) Download TVHarvest and unzip the contents into C:\Program Files\myHTPC.
You will need to edit the TVHarvest.exe.config file. Open it in Notepad and follow the instructions in the file – just type in the right code number for your state.
Now run TVHarvest.exe. Depending on your Internet connection speed, this may take a while as it downloads TV listings for all free-to-air channels for the next seven days.
Power it up
Launch myHTPC. You’ll first see the main menu.
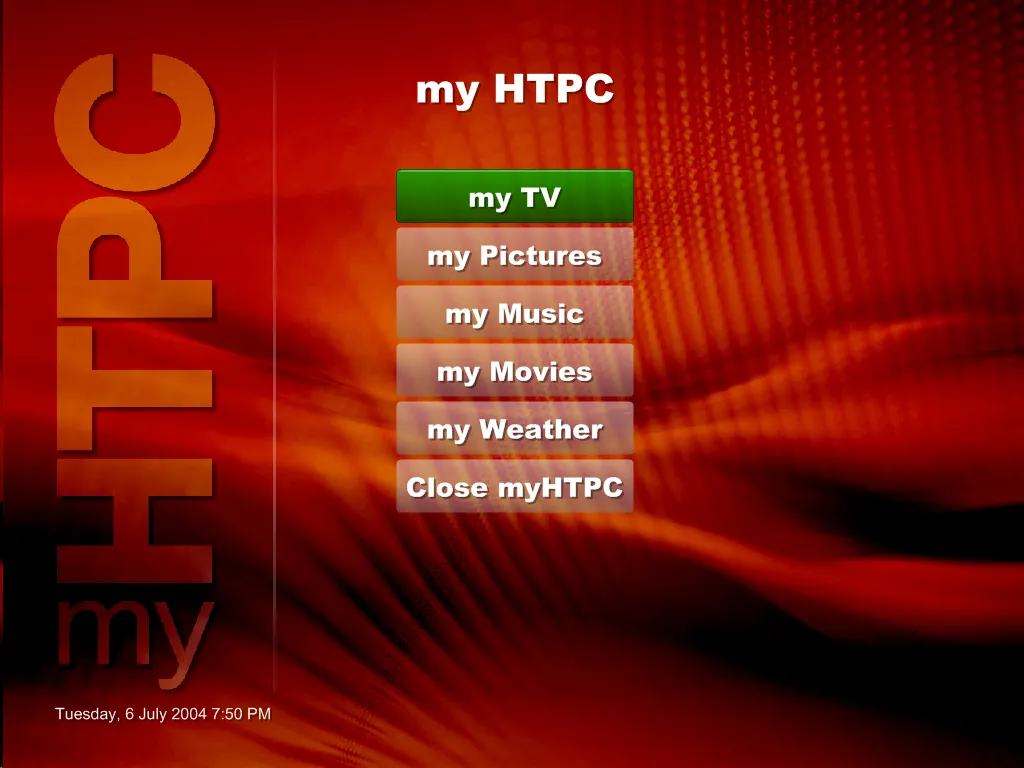
myHTPC main menu: looks fantastic and it’s easy to read at TV resolution
Select my TV, then TV Guide. If you set everything up correctly, you should now see this:
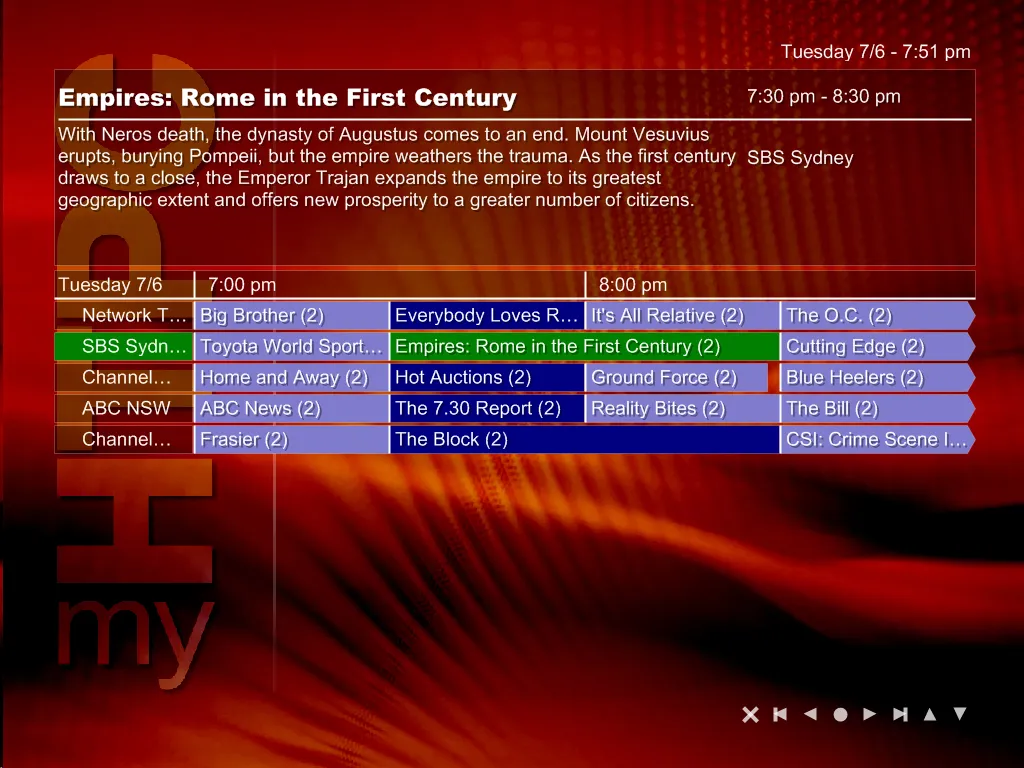
Electronic program guide: pick programs to record by name
There is one more change you need to make. Open the following file in Notepad: C:\Program Files\myHTPC\data\tv\listings\channel.ini. Match the names of the TV Channels in the EPG with the equivalent names of the channels in the VisionDTV Favourites List. Enter the equivalent VisionDTV channel name into the “number” entry in the file.
For example, here are a few example channels from a channels.ini set up for NSW, using the VisionDTV card.
[Network TEN Sydney]
number=TEN Digital
name=Network TEN Sydney

[SBS Sydney]
number=SBS DIGITAL 1
name=SBS Sydney
That’s it! Now launch myHTPC again. Select my TV, then select TV Guide. Click on the program you want to watch, schedule the recording, and you can verify by checking that scheduled TV recording details have been entered correctly in your viewer application (In VisionDTV, go into Properties and select the Recording Setup tab).
Remember, DABDig doesn’t currently support cancelling of scheduled recordings (unless you checked the Use JIT Recording checkbox in the myHTPC configuration), so you have to do that manually in the viewer application if you need to.
To keep your EPG up-to-date, you need to run TVHarvest manually every seven days, or use the Windows Task Scheduler to do it automatically.
Boxout: The software toolkit
You will be need to download the following free software from the web:
- Microsoft XML Core Services 4 SP2 (
http://www.microsoft.com/downloads/details.aspx?FamilyID=3144b72b-b4f2-46da-b4b6-c5d7485f2b42&DisplayLang=en) – a prerequisite for getting everything to work! - myHTPC Alpha Release 24 (
http://myhtpc.net/download/) – a menu driven front end with lots of features that looks similar to the user interface for Windows Media Center Edition - DABDig Version 2.50b14 (
http://www.spidersweb.freeserve.co.uk/dab/dabdig.zip) – an application that allows you to insert scheduled TV recordings into the digital TV recording application that comes bundled with your TV tuner card - DABDig myHTPC Plug-in (
http://www.myhtpc.net//pub/DABDig_Plugin) – makes DABDig work in conjunction with myHTPC, allowing you to browse the TV program guide using myHTPC menus and point-and-click to select a program for recording - XMLTV (
http://membled.com/work/apps/xmltv/) – an open source project that provides utilities to download TV listings from around the world into an XML file. - TVHarvest (
http://www.odgregg.homeip.net/Release.zip) – a utility for downloading TV program listings from the web and convert into the XMLTV format used by myHTPC
Boxout: Burn, baby, burn!
Once you start recording TV programs onto your HTPC you will realise your hard disk will quickly fill up! One option to manage the disk space is to transfer some of your TV recordings onto a DVD-R that can be played in your garden-variety DVD player.
Provided you are not too fussy about creating fancy menus you can do this entirely using freeware tools: PVAstrumento, IfoEdit, and DVD Decrypter.
The MPEG2 format used for digital TV broadcasts (transport stream) is slightly different to the format used for DVD (program stream). PVAstrumento is a utility that will convert your TV recording prior to authoring the DVD. You can download it from http://www.offeryn.de/dv.htm.
Run PVAstrumento, load your TV recording (typically a “.mpg” format file) and press demux. Change the MPEG Video extension to m2v and press start. At this point, you’re turning the transmitted MPEG-2 stream into separate video and audio files.
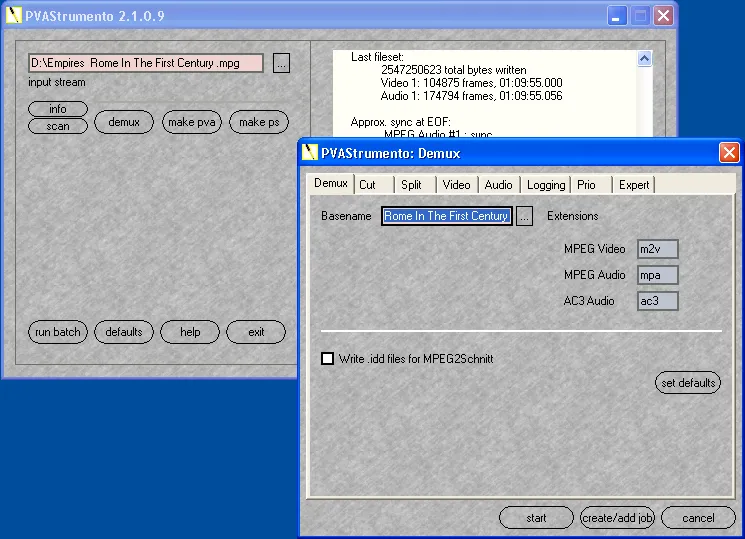
PVAstrumento: Demultiplexing the program stream into separate video and audio files.
If you want to remove extra material at the beginning and ending of the recording, cut out commercial breaks, and create chapter breaks, you can use a program called MPEG2schnitt (German for MPEG2cut) (http://www.mdienert.de/mpeg2schnitt/).
Now start IfoEdit (download from http://www.ifoedit.com) and select DVD Author | Author New DVD. Add in the video and audio files you just created and press the OK button. This sets up the files into a DVD file layout that any ordinary player will be able to read.
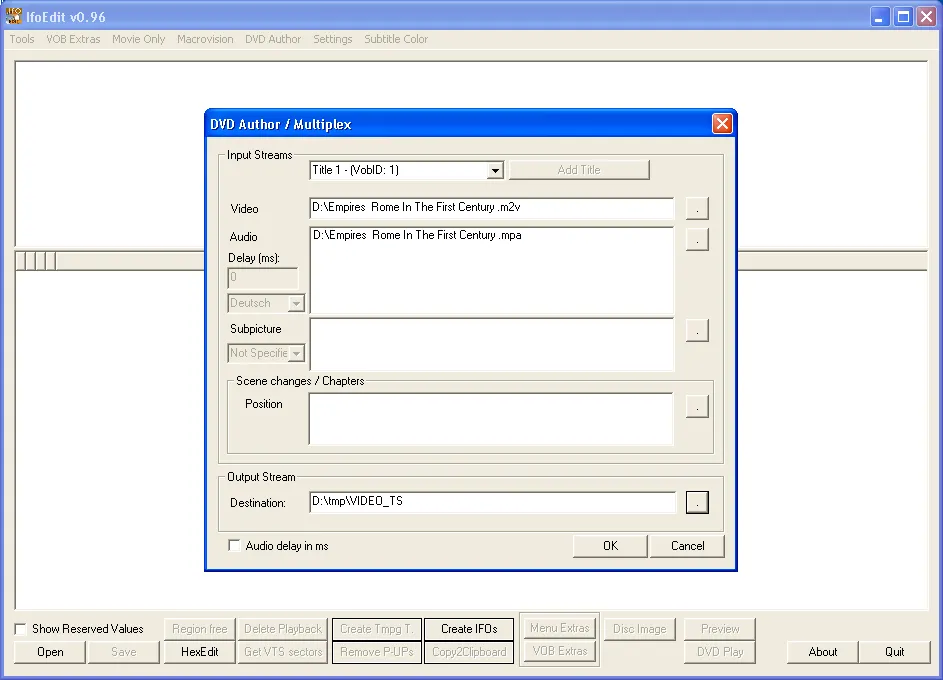
IfoEdit: Create a DVD from the separate video and audio files.
Now, turn to turn your file layout into a burnable disc image, press the Disc Image button, enter a filename and volume name for the DVD, and press Create Image. You can now burn the image using any DVD writing tool. A great freeware app for this is DVD Decrypter (http://www.dvddecrypter.com/). Although it started life as a program to rip DVD video off discs while stripping CSS encoding, it is also a top-notch disc burner. Launch the program, and insert a blank DVD-R into your burner. Select Mode | ISO | Write from the menu bar. Use the filename of the DVD image (extension .img) that you have created, press the Write button. Presto! You have just created a DVD!
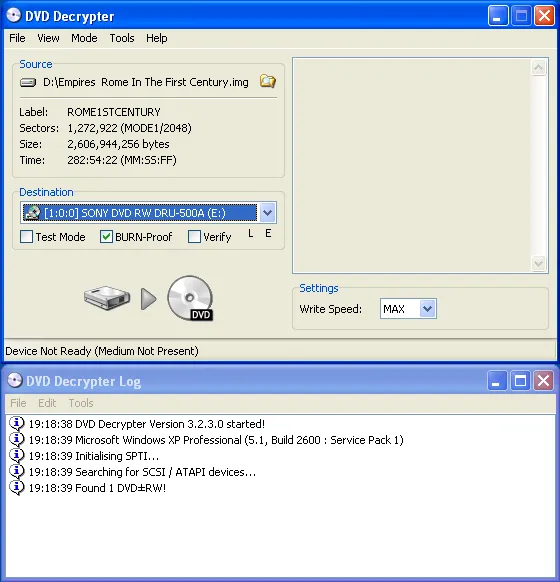
DVD Decrypter: It has a very useful ISO image writing mode to write your DVD image onto a blank DVD-R.
Sources
- The manuscript,
MyHTPC Workshop v3.doc, 49 KB, at 1,827 words, created as a save-as on the morning of Sunday the 11th of July 2004, Sydney time, and saved with one minute of recorded editing — the deadline-day trim of the Saturday draft. Its title property still carries the brief’s working title. Reproduced above and available for download at the head of this article. - The Saturday draft,
MyHTPC Workshop v2.doc, 58 KB at 2,162 words, and the first week’s draft,MyHTPC Workshop.doc, 50 KB at 1,783 words, begun on Monday the 5th of July at 11.12am and grown across the week to a last save on the Friday night — the same file whose first two hours were filed separately with the screenshots, abandoned mid-document under a bare “XMLTV” heading, and long mistaken for a damaged copy. - The brief,
BRIEF - Windows MyHTPC workshop.doc, archived with the roundup: 1,400 words at AUD$500, the batch’s highest rate, with a prescribed structure this manuscript follows almost clause by clause — the standfirst integrating the byline, the workshop details block, the inside info bar of URLs, and “3 – 4 screenshots with 10-20 word captions in format slug: caption”. - The invoice that bills this piece in full for the September 2004 issue is described with the roundup, and deliberately not archived.
- The screenshots:
myHTPCFig0.bmpzipped,myHTPCFig1andmyHTPCFig2delivered as both TIFF and zipped BMP, andDVDFig1toDVDFig3zipped, published here as PNG with their pixels unchanged. The myHTPC pair carry on-screen clocks from the evening of Tuesday the 6th of July 2004; the DVD trio follow one recording of SBS’s “Empires: Rome in the First Century” through the whole workflow on the Saturday. - Digital TV Software, APC’s edit of it, and Remote controls for your HTPC — the rest of the batch. The roundup’s myHTPC entry points at this piece with “see the APC tutorial on page XX”.